
HitLights LED Strip Lights, 4 Pre-Cut Waterproof RGB Small LED Light Strip Kit Dimmable Color Changing SMD 5050 LED Tape Light with RF Remote, UL-Listed Power Supply and Connectors for TV Bedroom Home
Product Description
HitLights LED Strip Lights, 4 Pre-Cut Waterproof RGB Small LED Light Strip Kit Dimmable Color Changing SMD 5050 LED Tape Light with RF Remote, UL-Listed Power Supply and Connectors for TV Bedroom Home
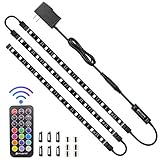
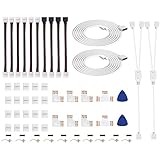
- All In One Kit. Everything you need including a 21 key RF remote, a 12V DC power supply, 4Pre-cut Total 48Inch 5050 LED Strip lights, plug and play extension wires (12 inch), adhesive backed wire clips to keep things neat.
- Excellent Ambient Light Kit for the Holidays! Super bright 5050 LED Strips, Pure color(Red blue green yellow blue purple), better visual enjoyment when have installed LED accent kit.
- Upgraded Strong LED Tape. In order to solve the customer's troubles of the light strip adhesive, we have used upgraded adhesive and adhesive backed wire clips for solve this problem. No need to worry about the falling off of the adhesive.
- Color Changing LED Tape Light with 360°RF Controller. The wireless remote controller can control the color at any time within the effective distance(MAX 66ft) without failing due to obstacle blocking. The ideal Choice for kitchen, under cabinet, dining room, bedroom, TV Backlights, PC etc.
- 1FT dimmable small RGB LED strip lights are the excellent ambient light kit for Halloween, Christmas, Thanksgiving, Parties, etc. When installing, please check the correct connection of the light strips.
Our Eclipse kits are designed by our in-house LED experts to put the FUN into functional by taking the pain out of installing RGB LED strips. Our pre-cut strips mean NO searching for the right place to cut, NO fooling with connectors, and NO frustration with inconsistent, flickering lighting. These strips are TRULY plug and play.</p><p>Each kit comes with a compact power supply with a four foot output cord, an Eclipse RGB controller / remote combo, four one foot weatherproof RGB Eclipse LED strip lights (backed with heavy duty adhesive tape), four one foot plug and play extension wires with 4-pin input and output plugs, and eight adhesive backed wire clips to keep everything neat, tidy, and out of the way - so all you'll see is the light from our high output RGB LED chips.</p><p>Our Eclipse kits are great to add lighting to PCs, televisions, media centers, recessed coves and crown moldings, displays, kitchen and bathroom cabinets, bedrooms, shelving - or even outside on decks and patios.</p><p>Product Components:<br/>• 1 x Eclipse RGB Controller (Remote Included) <br/>• 4 x 12 Inch Eclipse RGB Color Changing LED Light Strip (Black, Weatherproof / IP-65) <br/>• 1 x 12 Volt DC Power Supply <br/>• 4 x 12 inch Foot 4-Pin Connectors <br/>• 8 x Adhesive backed wire mounting clips</p><p>Technical Specifications : <br/>• Input : 12V DC / 12 Watts (2 Watts per strip)<br/>• Strip Dimensions : 304 x 10 x 3mm (12 x 3/8 x 3/32 inches)<br/>• LEDs : 48 (12 per strip)</p><p>Installation Instructions: <br/>• Clean the surface you intend to stick the light strip to <br/>• Peel off the backing strip off the adhesive tape <br/>• Press and hold the light strip firmly against the surface <br/>• Connect the 4-Pin input of the light strip to the 4-Pin output of the Controller <br/>• Connect the DC jack output of the power adapter to the DC jack input of the Controller <br/>• Remove the tab from the battery compartment of the remote control <br/>• Connect power supply to your wall outlet
Technical Specifications
You might also like

4pcs black 1M 3.28ft 4 Color RGB Extension Cable LED Strip Connector Extension Cable Cord Wire 4 Pin LED Connector for SMD 5050 3528 2835 RGB LED Light Strip (4 PCS)
HitLights LED Strip Lights 3 Pre-Cut 12Inch/36Inch LED Light Strip Flexible Color Changing 5050 LED Accent Kit with RF Remote, Power Supply, and Connectors for TV, Home, DIY Decoration

10pcs Black 0.3M 0.98ft 4 Color RGB Extension Cable LED Strip Connector Extension Cable Cord Wire 4 Pin LED Connector for SMD 5050 3528 2835 RGB LED Light Strip (10 PCS)

2 Way LED RGB Splitter Cable - 4PCS Black 5050 4 Pin RGB LED Strip Light Connector Splitter Y Wire with 12 PCS 4 Pin Male Connector for RGB 5050 3528 LED Light Strips

4 pcs/pack black 2M 6.56ft 4 Color RGB Extension Cable LED Strip Connector Extension Cable Cord Wire 4 Pin LED Connector for SMD 5050 3528 2835 RGB LED Light Strip ,rgb wire,rgb extension cable

TronicsPros 4 Pin LED Splitter Cable Flex LED Strip Connector 2 Way Y Splitter for One to Two SMD 5050 3528 2835 RGB LED Tape LED Ribbon LED Strip Light -30cm/12in Long (1 to 2 Splitter, Black, 2pcs)

HitLights LED Strip Lights 32.8ft Color Changing Tape Lights SMD 5050 300LEDs Flexible RGB Light Strips with RF Remote, UL Power Supply for Party TV Bedroom Home Decoration
5050 4Pin LED Strip Connector Kit with 2 Way RGB Splitter Cable, 6.6ft RGB Extension Cable, Strip to RGB Controller Jumper, LED strip to strip Jumper, L Shape Connectors, Gapless Connectors

TronicsPros 4 Pin LED Splitter Cable Flex LED Strip Connector 3 Way Splitter for One to Three SMD 5050 3528 2835 RGB LED Tape LED Ribbon LED Strip Light -30cm/12in Long (1 to 3 Splitter, Black, 2pcs)

4 pcs pack black 3M 9.84ft 4 Color RGB Extension Cable LED Strip Connector Extension Cable Cord Wire 4 Pin LED Connector for SMD 5050 3528 2835 RGB LED Light Strip rgb wire rgb extension cable